Showing posts with label budget. Show all posts

Top 10 Posts of 2017

Which ten posts did you enjoy the most from this past year? Some really surprised me -- see if your top picks made the list!


Some of the links on this site are affiliate links. This means if you click on a link and purchase something, I'll receive a small affiliate commission at no cost to you. Thanks so much for supporting my efforts with this blog!


I actually wasn't planning on doing a post like this, but I've had several new-in-the-past-year readers ask if I would. Part of me thought that a list like this would be boring to read, but then I realized how much I've been enjoying seeing these posts on the blogs I read, especially those I haven't followed very long.

So, here you go!

If you're fairly new here, I hope you have fun seeing a bit of what we were up to around here this past year.

And if you've got your own little personalized butt-groove carved out on my couch because you've been here so long, then see if you remember these posts and if any of them would make your list!

Project Snapshot Week 83

Some of the links on this site are affiliate links. This means if you click on a link and purchase something, I'll receive a small affiliate
commission at no cost to you. Thanks so much for supporting my efforts with this blog!


The goal of this post is to capture a memory from the past week, either with a camera, words, or both.  Time passes in the blink of an eye and this will create a collection of treasured memories from throughout the year.

My Snapshot(s)

We were able to check out a local children's museum for free - thanks to free passes from our library - and while we enjoyed seeing Gv play with all of the interactive exhibits, I was so glad we were getting to see what the place was like without having to pay for it.

It wasn't that the museum was done poorly.  It was just that I thought we could do a much better job finding our own fun.

Even though our budget often limits what we get to do for entertainment, it also forces us to think outside the box to come up with alternatives.  Sure, it often strains the old brain to do this, but after this museum visit, I've realized that's a good thing.  Besides not having to fork over admission fees for some pre-made activity, I think our home-made memories are far superior.

And even better, these home-grown activities obviously have a positive effect on Gv.  A large portion of our time in this kid's museum was spent in a little side room that was filled with books, maps, puzzles, games and toys related to different parts of the world.  We had this little corner all to ourselves and Gv was perfectly content occupying herself for almost an hour:


"I want the camera around my neck.  Gv take pictures!"


Pretty cool composition for a two-year-old, in my opinion!  Maybe I should make her my official blog photographer!

What was your favorite memory from this past week?  I'd love to hear about it!  Either leave a comment below or email me at lisahealy (at) outlook (dot) com.

Simple Homemade Bug Spray

Some of the links on this site are affiliate links. This means if you click on a link and purchase something, I'll receive a small affiliate commission at no cost to you. Thanks so much for supporting my efforts with this blog!


I've switched out many different household cleaning products for natural versions that I make myself (like odor eliminator, clothes and diaper detergent, dishwasher soap, and hand soap), but this was the first personal product that I actually tried creating on my own.

Finding a better bug spray was definitely a priority for us once Gv was born, because there was no way we wanted to spray scary chemicals all over our little baby.

But we live in Florida, where bugs are just a part of life all year round, and we like to do things outdoors, so we needed to figure out a solution pretty quickly after she arrived.

I'd seen lots of different recipes for DIY bug spray, but most of them seemed more complicated than I was looking for (my lazy self is always looking for a cheap shortcut), so I decided to experiment a little bit and see if I could come up with something simpler that worked.

While I'm still playing around with some stronger (read: stinkier) formulas that use more potent apple cider vinegar and fresh herbs that steep for a month at a time, I have hit upon a good, everyday mixture that doesn't smell bad and is a snap to throw together.


What You Need


1 part white vinegar (just fill half your bottle with it)

1 part distilled water (fill the other half with this and make sure the water is distilled so you don't grow a colony of disgusting mold!)

10 drops each of a variety of essential oils (we use citronella, tea tree, peppermint and sweet orange to help deter bugs, but we also make sure to include this one so that the spray smells good (which actually helps repel bugs, too!)

an empty spray bottle (I got ours at our local $ store, but these look great, too)


What You Do


1.  Dump everything into your spray bottle.

2.  Shake really well before each use.

3.  Start spritzing!

See, I told you it was easy!  And we've found that the scent is so much better than conventional bug sprays, too.  You might notice a little vinegar smell when you first spray it on, but it fades pretty quickly.  And if one of the oils (like citronella) smells too overpowering, just increase the amount of sweet orange and lavender.  You can even add in your favorite scent to tailor the formula to your preferences!


Do you do battle with bugs whenever you step outside your door, but don't want a flurry of nasty chemicals swirling around your head?  Then try this recipe for a homemade version.  Not only is it more natural, but it's cheap, too!  What do you think?  I'd love to hear - leave a comment here or email me at lisahealy (at) outlook (dot) com.  

Also, if you don't want to miss a single minute of great tips like this and all the fun around here, be sure to sign up for free updates and then look forward to having each post delivered right to your inbox. 

Linked up with:  Merry MondayMotivation MondayThoughtful SpotMom 2 Mom MondayWhat'd You Do This WeekendTotally Terrific TuesdayTwo Uses TuesdayLou Lou Girls Fabulous PartyTell it to Me Tuesday, Good Tips TuesdayTalented Tuesday, Wordless WednesdayA Little Bird Told MeWFMWHit Me With Your Best Shot, The Mommy Club, Summer Family Fun PartyCreative MusterGrandma Ideas, The Ladies CollectiveThis Is How We Roll, Frugal Family LinkyCreative WaysHearts for HomeCreative Exchange,I'm Lovin' It,Kitchen Fun & Crafty, Inspiration SpotlightHome MattersPretty Pintastic PartyFront Porch FridayWeekend PotluckAwesome Life FridayCreative Collection

Colorful Campout Birthday Party

Some of the links on this site are affiliate links. This means if you click on a link and purchase something, I'll receive a small affiliate commission at no cost to you. Thanks so much for supporting my efforts with this blog!


As the time drew near to celebrate another year of our little Gv, I began to contemplate the party situation.  We enjoyed last year's event and spending time with family and friends so much, but didn't necessarily think a full‐out party was something we wanted to establish as an annual tradition.

I mean, does a 2‐Year‐Old really need all that?

The answer, of course, is no, but as I said in last year's post, a birthday is really just an excuse to have a fun get‐together and so G and I decided to go for it.

15 Reasons to Love the Library!

Some of the links on this site are affiliate links. This means if you click on a link and purchase something, I'll receive a small affiliate commission at no cost to you. Thanks so much for supporting my efforts with this blog!


Did you know that March is National Reading Month?  I think it's mainly because Read Across America Day is held on March 2nd, which just happens to be the birthday of Dr. Seuss.  Not only that, but our friends across the pond enjoy their own celebration of reading this month with World Book Day(Have a child in school in the UK or Ireland and looking for costume ideas?  See what Gv and I did on her first Halloween, when we held our own little book character parade!) 

So with all these books being devoured and pages being flipped in homes all around the world, I figured it was time to make myself finally publish a post that I've had written for ages (almost since I started this blog last year) ‐ I'm going to give you 15 reasons to love the library!


Toddler‐Made Valentine's Day Cards (& What You Can Do if You're in a Pinch)

Some of the links on this site are affiliate links. This means if you click on a link and purchase something, I'll receive a small affiliate commission at no cost to you. Thanks so much for supporting my efforts with this blog!


We've been attending a weekly playgroup since the new year began and even though most of the kids are all preschool‐age or younger, we moms thought it would be fun to have them trade Valentine's cards with one another.

I knew Gv would enjoy making them herself and just had to figure out the best way to go about it.  I decided to print "Happy Valentine's Day!  Love, Gv" onto plain sheets of card stock paper.  I then handed her several sheets of heart stickers and a box of crayons before settling back to see what she'd do with it all.

It was very interesting to watch her process of first applying all the stickers to the paper (I was most amazed to see that she seemed to generally space them out so that they pretty much covered the entire page) and then using her crayons to draw on top of that.

When she was finished, I used my nifty fancy‐edged craft scissors to cut them all out (although pinking shears or even just regular scissors would work, too) and then added the names of the recipients.


We received a message saying that two new friends would be joining us the next day, so naturally we wanted to make sure they had their very own Valentine's Day cards, as well.

The only problem was, we'd already used up all our heart stickers, so I had to come up with an alternative idea that would be both quick and easy.

I grabbed some index cards, drew a heart with some markers, added the standard greeting, then handed them over to Gv so she could add her personal touch.  I really liked the idea of using index cards, so I might just use them (blank ones like this are best) for next year's cards. 


Do you prefer homemade Valentine's Day cards, or fancier store‐bought versions?  Have you thought about letting your toddler help create the cards?  I'd love to hear!  Leave a comment here, or email me at lisahealy (at) outlook (dot) com.  

Also, if you don't want to miss a single minute of great tips like this and all the fun around here, be sure to sign up for free updates and then look forward to having each post delivered right to your inbox. 

Linked up with:
Super Mommy Club
Kids Activities Blog
Makeovers & Motherhood
Spring Craft Blog Hop
Merry Monday
Thoughtful Spot
Mom 2 Mom Monday
Motivation Monday 
Good Tips Tuesday
Totally Terrific Tuesday
Tuesday Tutorials  
The Mommy Club
Hit Me With Your Best Shot
Works for Me Wednesdays
A Little Bird Told Me 
Thrifty Thursday
Creative Ways
Creative Exchange
Hearts for Home
Frugal Family LInky
This is How we Roll
Ladies Collective 
I'm Lovin It
Kitchen Fun & Crafty
Inspiration Spotlight
Pretty Pintastic Party
Mini Creations Wednesday
 

Framed Reindeer Footprint and Photo Gift


Some of the links on this site are affiliate links. This means if you click on a link and purchase something, I'll receive a small affiliate commission at no cost to you. Thanks so much for supporting my efforts with this blog! 


Last Christmas was Gv's first, and I knew I wanted to create a special gift for family members that included art that she had a hand (or in this case, a foot) in, as well as a special photo of the cutie patootie.

I lucked out and found some great matted double-photo frames at the local dollar store, because even an armful of JoAnn's coupons couldn't bring the price of fancier frames within our budget.  

Once I had the frames, I chose just the right photo for this project and had copies printed up at Sam's Club.

The easy part was done, now I just had to take care of the art part.

I began by cutting heavy watercolor paper into cards just a bit bigger than the second opening on the frame.  I next painted Gv's foot with brown craft paint and then pressed it to the paper to make the reindeer's head.

That was the hard part.  I never stopped to think about how difficult it would be to do this even once, much less twelve times (who's crazy idea was this, anyway?) to get enough copies for all the special people in our lives.

Gv, at seven months, was not in the mood to hold still enough for me to get a good print.  I even tried some of these while she was sleeping.  Some turned out better than others and I stressed about that fact for a while, but then realized that the smudges only added charm to the overall effect.

The final part was easy.  I painted in antlers and then added the eyes and nose with my fingerprints.  If I ever do this project again with Gv when she's older, I'll have her add the fingerprint eyes and nose herself.

I signed her name and put the date before getting everything in the frame and wrapping it all up.  

Everyone loved their gift and the creativity put into it.  Despite the difficulty in getting the footprints made, I really enjoyed creating this gift.


Are you looking for an affordable, adorable gift to make for your loved ones this Christmas?  Do you feel brave enough to try a project like this?  I'd love to hear - leave a comment or email me at lisahealy (at) outlook (dot) com.

Linked up with:
Yes Works for Me 
The Mommy Club
Kitchen Fun & Crafty
Inspiration Spotlight Party 
We Love Weekends   
Creative Exchange 
Creative Ways  
Merry Monday
Mom 2 Mom Monday
Thoughtful Spot Weekly Blog Hop
Motivation Monday 
Inspire Me Mondays
Good Tips Tuesday 
Totally Terrific Tuesdays 
Tuesday Tutorials  
12 Days of Christmas Link Up Party
Makeovers & Motherhood 
Super Mommy Club   
Kids Activities Blog   
Pintabulous Moms Christmas Linky

Easy Popcorn Costume

If you want to support what I’m doing with this blog, just follow any of the product links and order whatever you want at no additional cost to you.  That’s it and I’ll get a little bonus.  Thanks so much for clicking!


Last year, Gv was so still so little, it didn't make sense to haul her around trick-or-treating, so we created our own Halloween fun by holding a little book character parade, just the two of us.  This year, I knew she'd enjoy an introduction to the whole trick-or-treat experience, so I started pondering what would make a cute {and cheap!} costume for her early on in the month.

I was inspired by some laundry antics she engaged in one day - we have one of those mesh-and-wire foldable hampers and she'd started dancing around with it over her head.  I thought, "Hmmm, I could cut out a hole in the bottom, put her arms through the handles, and then fill it with towels and washcloths and she could be some laundry."


I headed to the dollar store to get a new hamper, because I only wanted to cut up the one we had if I could get a replacement.

No hampers.

I was so disappointed, because I'd gotten myself all jazzed for this idea, but then I saw this nifty popcorn box.

We love popcorn at our house and when I first noticed this box, I thought it would make the basis for a good gift basket (I still do!), but the more I thought about it, the more I realized it might also be the solution to my costume angst.  I bought the box and headed home.

First, I measured the base of the box and Gv's waist diameter, to make sure she would fit.  I was thinking I'd need to create straps so it could hang on her shoulders.  I had an extra set of shoelaces, so I figured I'd just punch some small holes in the top and thread them through.

Next, I took my trusty utility knife and sliced along the bottom edge.  I popped out the base and then covered the rough edge with regular old duct tape.  Ideally, it would have been nicer to use white duct tape , but I didn't have any on hand and figured it wasn't worth spending another dollar to get white, when it most likely wouldn't show too badly on the bottom anyway (I was right).
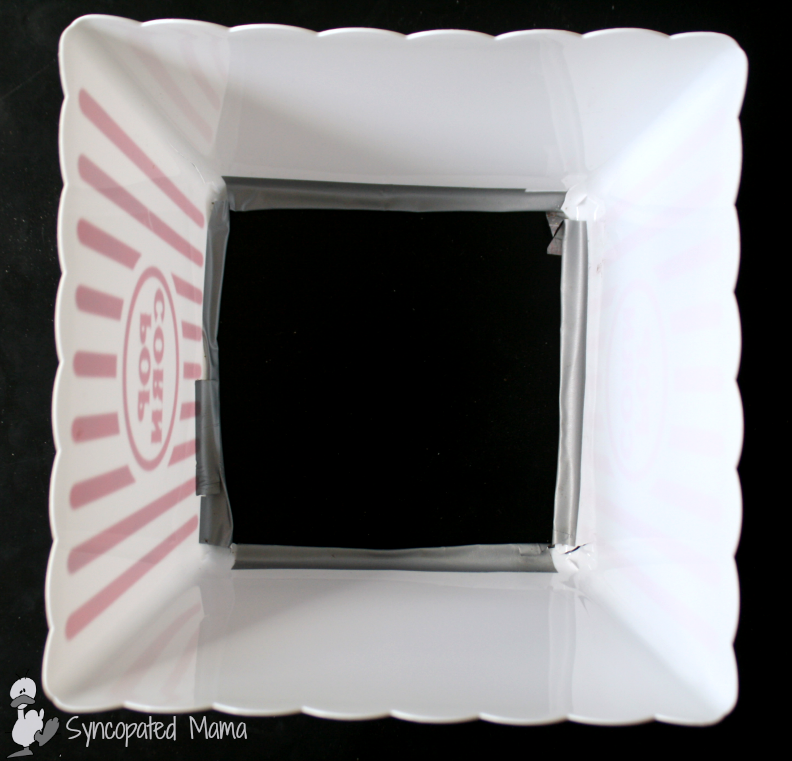


I grabbed a white onesie and slipped her legs through the bottom of the popcorn box to see how it fit.


She wasn't quite sure what to think of this contraption at first, but quickly became distracted by the sound of a dog barking in the distance and completely forgot she was wearing it.  I left it on a good half hour, just to make sure she'd tolerate it on Halloween night.

I was excited to discover that I didn't need to do anything else - it sat right on her little hips and still allowed her full range of movement in her arms and legs - she could even sit down in it with no trouble!

Finally, I added the finishing touch:  wadded-up white tissue paper to be the "popcorn" in her box!  On Halloween, I also dressed her in some white tights, but that's just because it was a little chilly (by Florida standards) and I wanted a little more of a barrier between her legs and the gazillion blood-thirsty mosquitoes who were also enjoying the trick-or-treating fun.


Now that Halloween is over, Gv's been playing with this box quite a bit.  She'll put it over her head for a game of peek-a-boo and then pull it down over her body before stepping out to repeat the whole process again.  It's been keeping her entertained quite a bit - Bonus!


Do you have a popcorn lover in your house?  If so, this easy, inexpensive costume might be just the thing for you!  And if you have a larger popcorn-lover, you could easily recreate this idea using a cardboard box and some paint.  What do you think?  Will you be buying your next costume, or making it yourself?  I'd love to hear - leave them here in the comments or email me at lisahealy (at) outlook (dot) com!


Linked up with Thrifty Thursday , Creative Ways Mommy Needs a Time-Out  , Creative Exchange , Frugal Family Linky Yes Works for Me Halloween Blog Hop Anything Halloween 
 

31 Days of Great Children's Music: Hear and Gone in 60 Seconds


If you want to support what I’m doing with this blog, just follow any of the product links and order whatever you want at no additional cost to you.  That’s it and I’ll get a little bonus.  Thanks so much for clicking!
 

Welcome back to 31 Days of Great Children's Music!  This is the big posting challenge I'm participating in that involves blogging every day in October covering just one topic.  It's also where you'll find some super suggestions for children's songs the whole family can enjoy.  

Find the Other 30 Days Here


I love the unique concept behind this album - it's a collection of original music from different popular children's music artists with each song lasting just a minute!  This means you get a great variety of musical styles on one album - it's like going to a buffet and getting to sample a little of everything!

I always seem to gravitate towards the silly songs on an album and my favorite selections from this collection of fun children's songs was no different.  Here are just a few:

More Than Just a Minute gets stuck in my head for days after I hear it, but that's okay, because it's a good song - it reminds me a little bit of Chris Rice's Cartoons song (which, by the way, is also a pretty fun song for kids, even though it's not on a kid's album).

I Love My Brother (Sometimes) just makes me laugh.  Not having siblings myself, I can't relate, but I have certainly heard all about this topic from my former primary students.

Rocks in My Pockets reminds me of a Broadway tune.  Now there's an idea for the next hit on the Big White Way - Rocks in My Pockets, Toads on My Toes, and Other Hazards of Raising a Boy.  I'll even let you develop that money-making idea yourself - just send me a couple of tickets for opening night, mmm-kay?

There's a Bowl of Milk in the Moonlight cracks me up, puts a stitch in my side, and reminds me of the Jingle Cats - Meowy Christmas album - or this commercial:


Activities

  • The song Hey, Picasso easily lends itself to all sorts of art projects.  You can Google or Pin projects until the cows come home, or you can grab these fabulous books for some creative ways to introduce your child to creating art in the different styles of the great masters:


  • Besides being super-catchy and reminding me of a pop song from the 80s, Alphabet Soup calls for both a fun meal and a clever letter-recognition game.  To play the game, simply fill a pot with water and dump in a set of magnetic letters like thesethen have your child scoop out certain letters (spelling their name, sight words, or in order of the alphabet) with a slotted spoon.
  • Learn to samba after listening to Samba One, Samba Two.  There are many YouTube videos that can teach you the basic steps.  Here's one to get you started:

To Read

  • Listen to Hey, Picasso and read up on great art as well as the artist's life:

  • I have had these adorable books on my wish list for some time and they would match up perfectly with Travelin' the USA:
 

More Music

You can find a couple of the artists I've highlighted on previous 31 Days posts on today's album.  See this post and this post for more.

I'll also be highlighting a couple of albums from other artists featured on this CD in upcoming posts.


How many of these artists of children's songs have you heard of?  I'd love to hear - leave a comment or email me at lisahealy (at) outlook (dot) com.  

Linked up with:  Merry Monday, Motivation Monday, Mom 2 Mom Monday, What'd You Do This Weekend, Good Tips Tuesday, Totally Terrific Tuesday, Tuesday Tutorials, Two Uses Tuesday, The Mommy Club, Hit Me With Your Best Shot, WFMW, Homestead Blog Hop,Wordless Wednesday,Fluster's Creative Muster, A Little Bird Told Me,Creative Ways, Thrifty Thursday, Creative Exchange, Hearts for Home, Frugal Family Linky, This is How We Roll, Ladies Collective,I'm Lovin It, Kitchen Fun & Crafty, Inspiration Spotlight, Awesome Life Fridays, Home Matters, Pretty Pintastic Party, Front Porch Friday,