Some of the links on this site are affiliate links. This means if you click
on a link and purchase something, I'll receive a small affiliate
commission at no cost to you. Thanks so much for supporting my efforts with this blog!
I'm not always into the Superbowl. It depends on whether there's a team I'm excited to root for (or against, as is the case this year) and whether the home team is playing (not likely to see that one again, after the way they've been playing for the last decade). But there's one aspect of Superbowl Sunday that I can always get excited about.
The food.
I'm all for any excuse to eat fun food and this day makes it easy to go wild with it. One thing you always need handy while watching the game is something tasty to dip your chips (or other yummy dippers) into.
Here are some (mostly) healthy options for you to try:
Straightforward Hummus - There's a reason this is one of the most popular dips today and sometimes you just can't go wrong with a classic version like this one!
Dairy-Free Dill Pickle Dip - All the punch of a good dill pickle, without all the drippiness of the juice.
30 Ways to Win with Hummus - If you're craving a little adventure with your chick peas, then check out this list.
Creamy Pesto Spinach Dip - The least healthy of the bunch, but oh, so tasty.
Kalamata Olive Dip - Hands-down, my most requested dip at get-togethers.
Dairy-Free Spinach Artichoke Dip - My first foray into dairy-free dip adaptation, and we still think it's the best dip ever.
Tunisian Sweet Potato Dip - Get your daily dose of a nutritious superfood with this healthy dip.
Once you've chosen your dip and dippers, then consider some other snacky treats to munch on while enjoying the highest-rated television event out there (or at least the funny commercials, if you don't care anything about the game).
Fill some Winning Wheat Snack Pockets with something delicious for a treat that fits right into the palm of your hand.
Make a run for the border with tacos or burritos made from this Healthy Tortilla Recipe.
Compliment all that beer you know you'll be guzzling with some Healthy Homemade Pretzels and accompanying Homemade Mustard.
Go with an obvious, but scrumptious choice, by making some Healthy Homemade Pizza.
Don't be afraid to try out a new recipe for game day. I always like making about half of my snacks from my favorite recipes and venturing out of my comfort zone for the others. I started this several years ago and now some of my experiments have become must-makes each year, like Pioneer Woman's Bacon Wrapped Jalapeno Thingies. Oh. My. Word. I will live with fire hands for days (because I'm stubborn and refuse to wear rubber gloves) just to savor the bacon-y goodness of these treats. (Yes, bacon can totally be an adjective. There's even a Facebook group that says so) Fix double, no, triple what you expect to eat, because trust me, they will disappear faster than a toupée on a windy day.
Now, go grab some pom-poms and cheer on those birds or soldiers while stuffing yourself silly with snacky treats. Then be all smug if you've made some of the recipes listed here, because they're almost all much healthier than your typical game day grub.
Do you have any favorite foods to enjoy while watching the big game? I'd love
to hear - leave a comment or email me at lisahealy (at) outlook (dot)
com.
Linked up with:
Thoughtful Spot
Merry Monday
Motivation Monday
Mom 2 Mom Monday
Good Tips Tuesday
Totally Terrific Tuesday
Tuesday Tutorials
The Mommy Club
Hit Me With Your Best Shot
Works for Me Wednesday
Thrifty Thursday
Creative Ways
Creative Exchange
Hearts for Home
Frugal Family LInky
I'm Lovin It
Kitchen Fun & Crafty
Inspiration Spotlight
Awesome Life Friday
Pretty Pintastic Party
Creative Collection
Makeovers & Motherhood
Super Mommy Club
Weekend Potluck
Showing posts with label dairy-free. Show all posts
Coconut Milk Caramels
If you want to support what I’m doing with this
blog, just follow any of the product links and order whatever you want off of
Amazon at no additional cost to you. That’s it and I’ll get a little bonus. Thanks so much for clicking!
I set out to make that batch of Caramel Apple Muffins the other day and realized I was happy with everything in it except the caramel. I'd never made caramel myself before, but I thought surely it would be worth getting past my candy-making trepidation in order to keep some of the junk out of these special seasonal treats.
What I discovered was that these candies are ridiculously easy to make and their taste transcends that bagged junk so much, I'm finding it extremely difficult not to eat the whole batch up just by itself.
That may not seem so hard to believe, but I am not a candy person, unless it's chocolate. I especially detest anything chewy and gooey like Tootsie Rolls, Now & Laters, Starburst, or caramels.
But OhMyGoodness. I have absolutely discovered my new binge food. You can bet that I'll be coming up with all sorts of baked creations that I can throw these little gems into, they're just so good.
1 cup honey
3/4 cup coconut milk (This is the BEST coconut milk to use in your cooking!)
1 1/2 teaspoons vanilla
2 Tablespoons butter
1. Combine honey and coconut milk in a sauce pan on high heat until it comes to a boil. Stir occasionally until mixture reaches soft ball stage (235-240 degrees on your candy thermometer
). I think this part was what most intimidated me about making candy, but there's really nothing to it if you use the thermometer!
2. Remove pan from heat and immediately stir in vanilla and butter until well combined.
3. Pour into a generously buttered 8x8-inch dish and freeze for 30 minutes.
4. Cut into squares (I find it's easiest to use kitchen shears
or a pizza wheel
) and add to your favorite recipes...that is, if you don't gobble them all up as you take them from the pan!
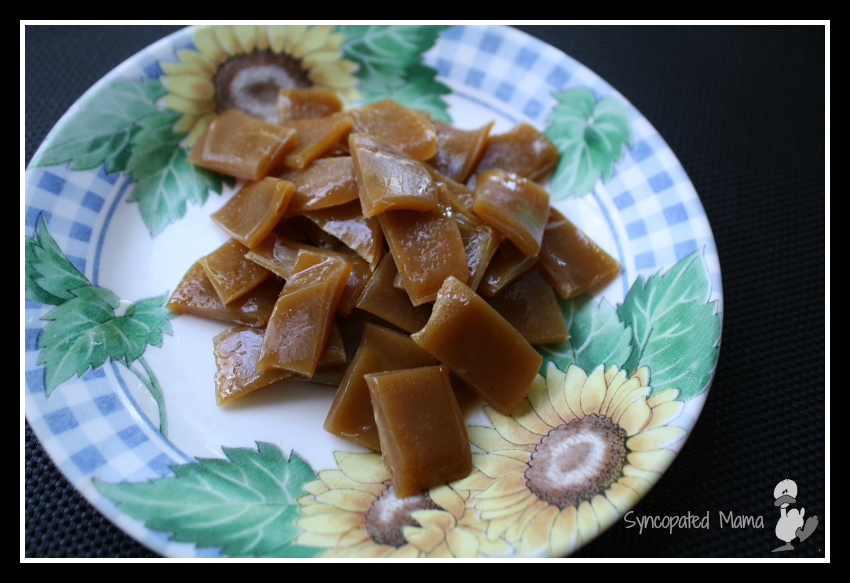
There! Isn't that much better than using something with a list of ingredients that were created in a lab? At first, I was intimidated by candy, but this recipe was so simple, I might be brave enough to venture further into candy-land. Have you made candy before? I'd love to hear - leave a comment or email me at lisahealy (at) outlook (dot) com.
Linked up with:
I'm Lovin It
Kitchen Fun & Crafty
Weekend Potluck
Inspiration Spotlight
Simple Saturdays Blog Hop
Creative Collection
Pretty Pintastic Party Linky
Merry Monday
Thoughtful Spot
Motivation Monday
Mom-to-Mom Link Up
Good Tips Tuesday
Totally Terrific Tuesday
Tuesday Tutorials
Yes Works for Me
The Mommy Club
Thrifty Thursday
Creative Collection
Mommy Needs a Time-Out
The Creative Exchange
Frugal Family Link-Up
Halloween Spooktacular Party
I set out to make that batch of Caramel Apple Muffins the other day and realized I was happy with everything in it except the caramel. I'd never made caramel myself before, but I thought surely it would be worth getting past my candy-making trepidation in order to keep some of the junk out of these special seasonal treats.
What I discovered was that these candies are ridiculously easy to make and their taste transcends that bagged junk so much, I'm finding it extremely difficult not to eat the whole batch up just by itself.
That may not seem so hard to believe, but I am not a candy person, unless it's chocolate. I especially detest anything chewy and gooey like Tootsie Rolls, Now & Laters, Starburst, or caramels.
But OhMyGoodness. I have absolutely discovered my new binge food. You can bet that I'll be coming up with all sorts of baked creations that I can throw these little gems into, they're just so good.
What You Need:
1 cup honey
3/4 cup coconut milk (This is the BEST coconut milk to use in your cooking!)
1 1/2 teaspoons vanilla
2 Tablespoons butter
What You Do:
1. Combine honey and coconut milk in a sauce pan on high heat until it comes to a boil. Stir occasionally until mixture reaches soft ball stage (235-240 degrees on your candy thermometer
![]() |
| (This took me literally just a couple minutes to make, since I used my awesome new induction cooktop) |
2. Remove pan from heat and immediately stir in vanilla and butter until well combined.
3. Pour into a generously buttered 8x8-inch dish and freeze for 30 minutes.
4. Cut into squares (I find it's easiest to use kitchen shears
There! Isn't that much better than using something with a list of ingredients that were created in a lab? At first, I was intimidated by candy, but this recipe was so simple, I might be brave enough to venture further into candy-land. Have you made candy before? I'd love to hear - leave a comment or email me at lisahealy (at) outlook (dot) com.
Linked up with:
I'm Lovin It
Kitchen Fun & Crafty
Weekend Potluck
Inspiration Spotlight
Simple Saturdays Blog Hop
Creative Collection
Pretty Pintastic Party Linky
Merry Monday
Thoughtful Spot
Motivation Monday
Mom-to-Mom Link Up
Good Tips Tuesday
Totally Terrific Tuesday
Tuesday Tutorials
Yes Works for Me
The Mommy Club
Thrifty Thursday
Creative Collection
Mommy Needs a Time-Out
The Creative Exchange
Frugal Family Link-Up
Halloween Spooktacular Party
on
Friday, November 14, 2014
Coconut Milk Caramels
2014-11-14T09:23:00-05:00
Syncopated Mama
dairy-free|DIY|healthy eating|recipe|
Comments
Labels:
dairy-free,
DIY,
healthy eating,
recipe
Dairy-Free Cream of Mushroom Soup
We love soup at our house, but it's usually difficult to agree on which type to make because I prefer thick, creamy soups and G would rather eat broth-based soups. Not because he doesn't like thick, creamy soups, but because those use cream and that means miserable headaches and congestion for someone with a dairy allergy.
So, just like I did with this dip and this one, I tried to come up with a way to get what we both want out of a dish. Forget compromise, I'm all about looking for the win-win, when it comes to food!
Here's what I came up with to create a thick, creamy soup that we both can enjoy:
What You Need:
8 cups of mushrooms
1 sliced onion
A handful of garlic cloves (...or two...we love garlic!)
A splash of coconut oil
Salt
Pepper
8 cups of water
1 teaspoon thyme
4 chunked potatoes (whatever non-sweet potatoes you have on hand works)
2 chunked sweet potatoes
1 cup wine (your favorite type - we used Cabernet Sauvignon, because that's what we had open)
At least 1 Tablespoon lemon juice
What You Do:
1. Begin by roasting the mushrooms, onion, garlic, and all the potato chunks in the oven. I ended up dividing it all between two 11x15 glass baking dishes. Drizzle a little (maybe a Tablespoon-ish?) coconut oil over everything and then sprinkle it all with salt and pepper. Stir each glass dish a bit to coat everything in oil and then stick it all in the oven for 30 minutes at 400 degrees. Stir everything again halfway through, to ensure even roasting.
2. When the roasting has finished, dump the contents of the baking dishes into a pot along with the water and thyme.
3. Pour the wine into the glass baking dishes to help loosen all the browned bits of goodness from the pans. Once you've scraped up all you can, pour it all into the pot with the rest of your ingredients.
![]() |
| Pre-blending stage |
4. Use an immersion blender
5. Add lemon juice, a Tablespoon at a time, along with some more salt. You're going to want to just add both of these, stir it up, then taste and repeat, until it's as tangy as you want it.
If you want an exact-measurement recipe to follow that will produce identical results every time, then this soup is not for you. This dish is best for experimenting with - for adding more mushrooms when you got a bunch on sale and more potatoes when you can't find a good mushroom deal.
And you have to taste it. A lot, especially if you want to get just the right zing of lemon juice.
But isn't sampling the best part of cooking?
Does the thought of playing around with a "recipe idea" give you the jitters, or are you more of a "dash & pinch" kind of cook? I'd love to hear - leave a comment or email me at lisahealy (at) outlook (dot) com.
Linked up with Thrifty Thursday at Living Well Spending Less
Yes Works for Me at We are THAT Family
I'm Lovin It at Tidy Mom
Kitchen Fun & Crafty at Kitchen Fun with My 3 Sons
Creative Ways Link Party
Weekend Potluck
Sunday Night Soups
on
Friday, August 08, 2014
Dairy-Free Cream of Mushroom Soup
2014-08-08T08:00:00-04:00
Syncopated Mama
dairy-free|healthy eating|recipe|
Comments
Labels:
dairy-free,
healthy eating,
recipe
Dairy-Free Dill Pickle Dip
If you want to support what I’m doing with this
blog, just follow any of the product links and order whatever you want off of
Amazon at no additional cost to you. That’s it and I’ll get a little bonus. Thanks so much for clicking!
I love dill pickles.
I love how they snap and crunch when I bite into them and the way they make my face pucker up when that juicy sourness hits my tongue.
So I was over the moon when I ran across a recipe for dill pickle dip the other day. However, in typical dip fashion, the main ingredients were cream cheese and sour cream.
Ugh. Like I said in my Delicious Dairy-Free Spinach Artichoke Dip post, you can pretty much add anything to cream cheese or sour cream and wind up with a tasty dip.
Not exactly the healthiest option, especially when your significant other is allergic to dairy.
But now that the idea of a dip full of dill pickle goodness was stuck in my head, I knew I just had to figure out a way to make it.
I used my spinach artichoke dip for inspiration and created what I think is the perfect tangy dip for pickle-lovers everywhere. Even if you don't have any problems with dairy, this dip is a healthier option for your snack cravings!
1 cup of soaked nuts (I used almonds)
2 large dill pickles
1/4 of an onion
pickle juice (possibly)
1. Soak your nuts for an hour or two (or even longer if you're interested in added digestion and nutritional benefits). This amount of time will make them a bit softer and create a better consistency for your dip.
2. Process the drained nuts in your Ninja (get one here)
or food processor (find one here)
until they're chopped up really well.
3. Add in the pickles and the onion and process until everything is all blended together.
4. If this mixture looks a little dry for your tastes at this point, then add in some pickle juice. Try a Tablespoon at a time until it looks the way you want it to.
Mmmm...I thought this was so delicious, I gobbled it all up before G had a chance to try it, which of course meant I had to make another batch right away...
Do you love dill pickles, too? If so, go whip up a batch of this dip and try your best to do a better job sharing it with the rest of your family than I did. Then come tell me what you thought. Leave a comment or email me at lisahealy (at) outlook (dot) com.
Linked up with Thrifty Thursday at Living Well Spending Less
Linked up with I'm Lovin It at Tidy Mom
Linked up with Kitchen Fun & Crafty at Kitchen Fun with My 3 Sons
Linked up with Yes Works for Me at We Are THAT Family
Linked up with Creative Ways at Posed Perfection
Linked up with Weekend Potluck at Frugal Family Favorites
I participated in Simple Saturdays Blog Hop
Merry Monday
Motivation Monday
The Mommy Club
Weekend Traffic Jam
I love dill pickles.
I love how they snap and crunch when I bite into them and the way they make my face pucker up when that juicy sourness hits my tongue.
So I was over the moon when I ran across a recipe for dill pickle dip the other day. However, in typical dip fashion, the main ingredients were cream cheese and sour cream.
Ugh. Like I said in my Delicious Dairy-Free Spinach Artichoke Dip post, you can pretty much add anything to cream cheese or sour cream and wind up with a tasty dip.
Not exactly the healthiest option, especially when your significant other is allergic to dairy.
But now that the idea of a dip full of dill pickle goodness was stuck in my head, I knew I just had to figure out a way to make it.
I used my spinach artichoke dip for inspiration and created what I think is the perfect tangy dip for pickle-lovers everywhere. Even if you don't have any problems with dairy, this dip is a healthier option for your snack cravings!
What You Need:
1 cup of soaked nuts (I used almonds)
2 large dill pickles
1/4 of an onion
pickle juice (possibly)
What You Do:
1. Soak your nuts for an hour or two (or even longer if you're interested in added digestion and nutritional benefits). This amount of time will make them a bit softer and create a better consistency for your dip.
2. Process the drained nuts in your Ninja (get one here)
3. Add in the pickles and the onion and process until everything is all blended together.
4. If this mixture looks a little dry for your tastes at this point, then add in some pickle juice. Try a Tablespoon at a time until it looks the way you want it to.
Mmmm...I thought this was so delicious, I gobbled it all up before G had a chance to try it, which of course meant I had to make another batch right away...
Do you love dill pickles, too? If so, go whip up a batch of this dip and try your best to do a better job sharing it with the rest of your family than I did. Then come tell me what you thought. Leave a comment or email me at lisahealy (at) outlook (dot) com.
Linked up with Thrifty Thursday at Living Well Spending Less
Linked up with I'm Lovin It at Tidy Mom
Linked up with Kitchen Fun & Crafty at Kitchen Fun with My 3 Sons
Linked up with Yes Works for Me at We Are THAT Family
Linked up with Creative Ways at Posed Perfection
Linked up with Weekend Potluck at Frugal Family Favorites
I participated in Simple Saturdays Blog Hop
Merry Monday
Motivation Monday
The Mommy Club
Weekend Traffic Jam
Delicious Dairy-Free Spinach Artichoke Dip - Part 2
Have you been on the edge of your seat, just waiting to hear how my dip experiment turned out? Oh, I'm pretty sure you've had better things to do, but here's where the post gets really exciting - I share the recipe! Read Part I here, in case you missed it.
This post includes affiliate links. If you order something, I will receive a small commission at no cost to you. And thanks so much for clicking!
So I stick the nuts and milk in my trusty food processor, then call G and Gv in from the backyard, where they’d gone to escape all the crazy nut-grinding noise. I add the other ingredients into the bowl and then attack the artichokes.
This post includes affiliate links. If you order something, I will receive a small commission at no cost to you. And thanks so much for clicking!
So I stick the nuts and milk in my trusty food processor, then call G and Gv in from the backyard, where they’d gone to escape all the crazy nut-grinding noise. I add the other ingredients into the bowl and then attack the artichokes.
Oh. My.
Three hours later (no joke), I have finally finished taking
apart those darned things. I will not
recount the process, but let me just say it included lots of “Not until I
finish this stupid dip!” and “Just let me get this done cause I’m starving!” and
“This better be the best dang dip that ever existed!” comments during the whole
thing.
I jam the stupid artichoke pieces into the food processor and guess
what? It doesn’t process
everything. I should have thought about
the single tiiiiiny little blade waaaay down there at the bottom of the bowl
and asked myself how it could possibly chop all the spinach and stupid
artichoke pieces I jammed in up to the rim of the lid, but nope, that never even crossed my
mind.
The recipe I'd based this off of had pulsed the nuts in a blender and I'd thought that was a crazy idea, since I always make my nut butters and other nut-grinding thingies in my trusty food processor,
so it got me all
myopic that way. I probably would have
used our super-cool new Ninja,
if I’d been using my brain, since it has the three levels of blades, but at least my brain had finally started to work, despite
the stupid artichoke-peeling coma I was in.
So I scrape out all the junk from the blender and get it all
into the Ninja and it took about two seconds to blend and I decided that I
really needed to try to keep an open mind about this stupid dip because if I
had used canned or jarred artichokes and the Ninja from the start, this would be
probably one of the quickest, easiest dips on the planet.
Even though this dip had no reason to be baked (no cheese to melt), I decided
I’d probably still prefer it warm, so I stuck it in the toaster oven for about
ten minutes.
We were both starving, and totally over this dip by the time
we sat down to eat it. We each took a
bite and remarked that it was okay, but maybe needed some Crystal
(hot sauce) or something else to jazz it up a bit.
Luckily, laziness won out (or being just plain worn out, which I was
after getting the meat out of those stupid artichokes) and we just kept eating the dip as it was and we started to realize that although the flavor was more subtle that
we’re used to, it was really, really good.
So good, in fact, that it was proclaimed the best dip ever.
So here’s the recipe, and although I know we’ll make it like
this in the future, I can also see playing around with it quite a bit. I’d probably add more garlic (you can never
have too much garlic!) and some cayenne pepper to jazz it up for something
different, but really, it’s just so very good like this:
What You Need
¾ c. almonds
¾ c. almond milk
3 Tbsp. lemon juice
3-4 cloves garlic
¾ tsp. salt
½ tsp. ground mustard
¼ tsp. pepper
2 c. fresh spinach leaves (pack or don’t pack, depending on
how spinachy you want it)
2 c. artichokes (canned or jarred – please don’t put
yourself through that crazy peeling experience!)
What You Do
2. Add the rest of the ingredients and blend to whatever consistency you’d like. I did it until it was all smooth.
3. Transfer to an oven-proof dish and bake about ten minutes at 375 degrees, or until warmed through. We ate ours with our healthy-ish tortilla chips, but that’s only because I was too lazy/worn out from artichoke peeling to slice up some bread.
Are you hankering for a new dip to try? One that's really tasty, but healthy, and doesn't rely on cheese to make it delicious? Then give this recipe a go! I'd love to hear about it if you do!
Linked up with Kitchen Fun & Crafty Friday link party. More great ideas there!
Linked up with I'm Lovin' It Fridays. More great ideas there!
Linked up with Works for Me Wednesdays at We Are THAT Family
Linked up with Thrifty Thursday at Living Well Spending Less
Linked up with Creative Ways at Posed Perfection
Linked up with Weekend Potluck at Frugal Family Favorites
Linked up with In the Playroom
I participated in Simple Saturdays Blog Hop
on
Friday, March 07, 2014
Delicious Dairy-Free Spinach Artichoke Dip - Part 2
2014-03-07T13:34:00-05:00
Syncopated Mama
dairy-free|healthy eating|recipe|
Comments
Labels:
dairy-free,
healthy eating,
recipe
Subscribe to:
Posts (Atom)


